apt 的 invalid signatures / public key is not available (NO_PUBKEY/EXPKEYSIG/KEYEXPIRED) 問題處理方式

症狀 – apt / apt-get 操作時出現以下錯誤:

Err:4 https://dl.winehq.org/wine-builds/ubuntu xenial InRelease
  The following signatures couldn't be verified because the public key is not available: NO_PUBKEY 76F1A20FF987672F
Reading package lists... Done
W: GPG error: https://dl.winehq.org/wine-builds/ubuntu xenial InRelease: The following signatures couldn't be verified because the public key is not available: NO_PUBKEY 76F1A20FF987672F
E: The repository 'https://dl.winehq.org/wine-builds/ubuntu xenial InRelease' is not signed.
N: Updating from such a repository can't be done securely, and is therefore disabled by default.
W: An error occurred during the signature verification. The repository is not updated and the previous index files will be used. GPG error: https://deb.torproject.org/torproject.org bionic InRelease: The following signatures were invalid: EXPKEYSIG 74A941BA219EC810 deb.torproject.org archive signing key
W: Failed to fetch https://deb.torproject.org/torproject.org/dists/bionic/InRelease  The following signatures were invalid: EXPKEYSIG 74A941BA219EC810 deb.torproject.org archive signing key
W: Some index files failed to download. They have been ignored, or old ones used instead.
W: An error occurred during the signature verification. The repository is not updated and the previous index files will be used. GPG error: http://apt.puppetlabs.com trusty Release: The following signatures couldn't be verified because the public key is not available: NO_PUBKEY 7F438280EF8D349F
W: Failed to fetch http://apt.puppetlabs.com/dists/trusty/Release
W: Some index files failed to download. They have been ignored, or old ones used instead.

可以看到上面缺的 key 分別是 76F1A20FF987672F74A941BA219EC8107F438280EF8D349F ,這種情況有可能是新增了新的 apt repository 但沒有對應的 key,或是舊有的 apt repository 所使用的 key已經過期了

通常可以到對應軟體提供者的網站上找到正確的 key ,並放到 /etc/apt/trusted.gpg 這個檔案、或 /etc/apt/trusted.gpg.d 目錄下,或是透過 apt-key 的指令從 keyserver 進行下載匯入,像是這樣(以 Yarn 和 Google Cloud 的套件庫為例):

  • curl -sS https://packages.cloud.google.com/apt/doc/apt-key.gpg | sudo apt-key add –
  • curl -sS https://dl.yarnpkg.com/debian/pubkey.gpg | sudo apt-key add -

我們也可以透過將有問題/闕漏的 key 直接拿去問 OpenPGP keyserver ,透過 apt-key adv --keyserver keyserver.ubuntu.com --recv-keys XXXXXXXX 的指令,像這樣:

$ sudo apt-key adv --keyserver keyserver.ubuntu.com --recv-keys 7F438280EF8D349F
Executing: /tmp/apt-key-gpghome.VyE6MFMrnc/gpg.1.sh --keyserver keyserver.ubuntu.com --recv-keys 7F438280EF8D349F
gpg: key 7F438280EF8D349F: public key "Puppet, Inc. Release Key (Puppet, Inc. Release Key) <[email protected]>" imported
gpg: Total number processed: 1
gpg:               imported: 1
$ sudo apt-key adv --keyserver keyserver.ubuntu.com --recv-keys 74A941BA219EC810
Executing: /tmp/apt-key-gpghome.lRWvuhWnPw/gpg.1.sh --keyserver keyserver.ubuntu.com --recv-keys 74A941BA219EC810
gpg: key EE8CBC9E886DDD89: public key "deb.torproject.org archive signing key" imported
gpg: Total number processed: 1
gpg:               imported: 1
閱讀全文

清理 systemd 的 journal 檔案

使用 systemd 的 Linux 作業系統通常會在目錄 /var/log/journal/ 下存放 systemd-journald 這個服務所蒐集到的系統的 log 檔案,時間久了如果沒清理就可能會佔用一定大小的磁碟空間,對日常使用不會有什麼明顯影響,但是當磁碟空間不夠用、或是想要封裝、轉移系統的時候,清理這個目錄就會很有幫助 (可以少處理一些檔案),當然有這種情況時 /var/log 底下的其他 log 檔案可能也要清理,不過瞥除跑對外服務可能產生的大量 log 外,systemd 的 journal 也許會相對佔用比較多空間,可以考慮優先處理。

對於刪除不認識的檔案難免會擔心是否造成不良的影響,一般來說清除 systemd 的 journal 檔案並不會對系統造成危害,可以放心操作,但要不要清理這種事就見仁見智,保留太久的日誌有時候不見得有什麼價值 (當然還是看主機性質而定),有些人可能永遠用不到這些 log 、有些人可能經常會需要靠 log 來 debug 問題,清理後系統的 log 變少了省下空間,但如果剛好在追問題的話可能就暫時先避免類似的操作,或是清理時還是要保留一些 log 下來,以免相關資訊被清掉了增加追查問題的難度

Systemd-journald 預設使用的空間是磁碟大小的一成空間、上限是 4GB,要了解目前的上限以及使用狀況可以透過 journalctl -u systemd-journald 來得知:

$ sudo journalctl -u systemd-journald | tail -n 5
-- Reboot --
Jan 04 16:48:07 x systemd-journald[489]: Journal started
Jan 04 16:48:07 x systemd-journald[489]: Runtime journal (/run/log/journal/ef635a010d284bc38d762d2b9f0e65ac) is 8.0M, max 158.0M, 150.0M free.
Jan 04 16:48:07 x systemd-journald[489]: Time spent on flushing to /var is 177.349ms for 1008 entries.
Jan 04 16:48:07 x systemd-journald[489]: System journal (/var/log/journal/ef635a010d284bc38d762d2b9f0e65ac) is 4.0G, max 4.0G, 0B free.

也可以透過 dujournal --disk-usage 指令看目前使用的空間,像我這台主機就被佔用了 4GB :

$ du -d 0 -h /var/log/journal/
4.1G	/var/log/journal/

$ sudo journalctl --disk-usage
Archived and active journals take up 4.0G in the file system.

如果這時候找不到 /var/log/journal/ ,那有可能是因為這個目錄曾經被刪除過 (刪除後不一定會自動重建、要看設定)、或是 systemd 的設定是不會把 log 直接保存在磁碟上,這時後 log 可能就只有放在 /run/log/journal/ ,那就不是佔用磁碟空間、而是使用記憶體空間,清理的時機或動機就不太一樣。

最簡單的清理方式就是直接砍檔案,要小心的是除非之後不打算讓 journal 繼續往磁碟上寫,否則別把整個 /var/log/journal/ 資料夾都砍了,砍底下的內容就好

使用 rm 指令清理 /var/log/journal/ 目錄

這邊搭配 -rf 參數

$ sudo rm -rf /var/log/journal/*

砍完之後記得重啟 systemd-journald 服務:

閱讀全文

在 Ubuntu ≥ 18.04 使用密碼登入 MySQL 及建立資料庫

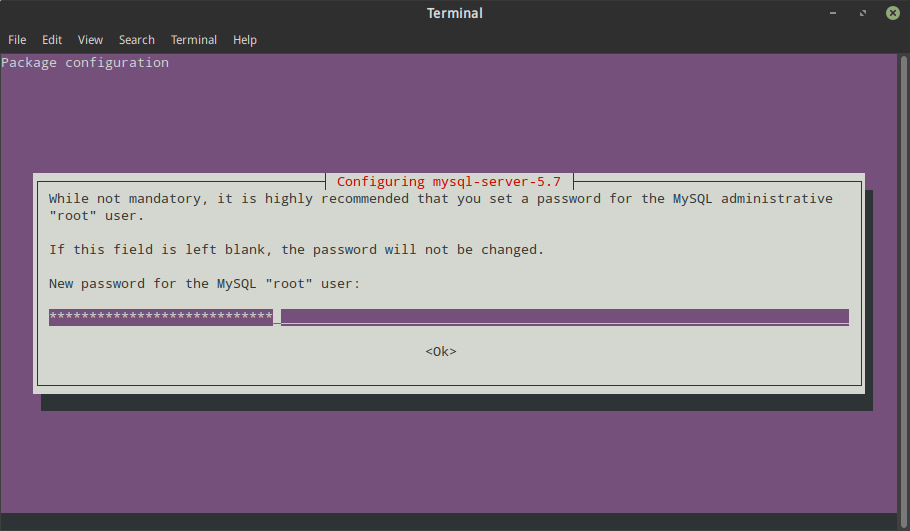
在 Ubuntu 18.04 之前的版本,直接透過 apt 安裝 Ubuntu 套件庫中的 MySQL 資料庫 (sudo apt install mysql-server) 過程中會有設定 root 密碼的提示畫面:

在 Ubuntu 16.04 LTS 上透過系統預設的 apt 套件庫安裝 MySQL 5.7 的 root 密碼設定提示畫面

但從 Ubuntu 18.04 開始,安裝預設套件庫提供的 MySQL 就已經不會在安裝過程中提示設定 MySQL 的 root 使用者密碼,因為 root 帳戶預設已經不再使用密碼的來做驗證,對於不熟悉 MySQL 操作的使用者可能會造成一些困擾,畢竟這樣就無法直接在安裝 MySQL 後透過 phpMyAdmin 的方式來操作資料庫或建立使用者了,更別說有些使用者可能會直接使用 root 的帳戶給應用程式如 WordPress 或 Joomla 、Drupal 等系統使用,那如果想要透過密碼登入 MySQL 資料庫該怎麼做呢?

  1. 把 root 改為使用密碼驗證登入
  2. 另外建立一個透過密碼驗證登入的使用者

建議使用第二種方式會比較安全一些,這樣一來就只有能取得本機 root 權限的使用者能夠登入 root 帳戶,而不用擔心從應用程式面可以進行密碼暴力攻擊。兩種做法都必須使用到 MySQL command-line client 來操做,但過程並不會很複雜,以下簡單說明

閱讀全文

A rapid way to erase multiple partition tables on Ubuntu/Debian Linux

When doing labs / playing with ZFS on Linux, ZFS pool may creates a few partitions on each drive, we may want to erase all the playground partition table to start from scratch again(though it may not be required), if we have many drives like more than 10, and we want to erase them all, it’ll take a while to finish the job.

Here is a rapid method to do it, using the non-interactive command sgdisk from package gdisk – the GPT fdisk text-mode partitioning tool, with parameter -Z or -o (both work in my case):

$ sudo sgdisk -Z /dev/sda
GPT data structures destroyed! You may now partition the disk using fdisk or other utilities.
$ sudo sgdisk -o /dev/sdb
The operation has completed successfully.

According to the help message, by specifing parameters -Z, it’ll zap (destroy) the GPT and MBR data structures and exit, and by specifing parameters -o, it’ll clear out all partition data. This includes GPT header data, all partition definitions, and the protective MBR.

Because the command sgdisk is non-interactive, so we can simply integrate the whole massive partition clean up job with shell scripts, for example:

#!/bin/bash
sudo sgdisk -Z /dev/sda &
sudo sgdisk -Z /dev/sdb &
sudo sgdisk -Z /dev/sdc &
sudo sgdisk -Z /dev/sdd &
sudo sgdisk -Z /dev/sde &
sudo sgdisk -Z /dev/sdf &
sudo sgdisk -Z /dev/sdg &

That’s it! Happy hacking!