How to determine/find UUID of a partition?

In Linux, UUID(Universally Unique Identifier) can identify media more accurately and reliable, identify media via /dev/hdxy or /dev/sdxy is not a good method because the order may be different between boots, so it was no longer preferred any more, especially in fstab or grub config.

How to find UUIDs of my hard disk partitions?

$ ls -l /dev/disk/by-uuid

total 0
lrwxrwxrwx 1 root root 11 Feb 16 03:59 1898d5ea-dcea-4959-94a9-ff21a163ba85 -> ../../zram5
lrwxrwxrwx 1 root root 11 Feb 16 03:59 41e9022c-9a91-446c-a05c-2e3cd03f2180 -> ../../zram6
lrwxrwxrwx 1 root root 11 Feb 16 03:59 4ca3ac3b-0ada-419c-8c9b-a292c3e41e43 -> ../../zram3
lrwxrwxrwx 1 root root 11 Feb 16 03:59 6165ed95-d7f2-4997-9496-9bc8df9be3d2 -> ../../zram4
lrwxrwxrwx 1 root root 11 Feb 16 03:59 7356c5f2-3379-4953-914c-ba2e598c828e -> ../../zram0
lrwxrwxrwx 1 root root 11 Feb 16 03:59 92d32f20-bc55-4698-9096-a4966061dcf8 -> ../../zram1
lrwxrwxrwx 1 root root 10 Feb 16 03:59 a6127375-d994-4cd0-ab11-5f4bf65f9f3e -> ../../sda1
lrwxrwxrwx 1 root root 11 Feb 16 03:59 af5e0104-1213-4e49-aea2-c177c97e7118 -> ../../zram7
lrwxrwxrwx 1 root root 11 Feb 16 03:59 b4f51d6c-29bd-4655-b6c9-8acb6b8a2c9f -> ../../zram2
lrwxrwxrwx 1 root root 10 Feb 16 03:59 dca199dd-3e9f-4381-8637-22354b0b11f4 -> ../../sda5

or

$ blkid

/dev/sda5: UUID=”dca199dd-3e9f-4381-8637-22354b0b11f4″ TYPE=”swap”
/dev/sda1: UUID=”a6127375-d994-4cd0-ab11-5f4bf65f9f3e” TYPE=”ext4″
/dev/zram0: UUID=”7356c5f2-3379-4953-914c-ba2e598c828e” TYPE=”swap”
/dev/zram1: UUID=”92d32f20-bc55-4698-9096-a4966061dcf8″ TYPE=”swap”
/dev/zram2: UUID=”b4f51d6c-29bd-4655-b6c9-8acb6b8a2c9f” TYPE=”swap”
/dev/zram3: UUID=”4ca3ac3b-0ada-419c-8c9b-a292c3e41e43″ TYPE=”swap”
/dev/zram4: UUID=”6165ed95-d7f2-4997-9496-9bc8df9be3d2″ TYPE=”swap”
/dev/zram5: UUID=”1898d5ea-dcea-4959-94a9-ff21a163ba85″ TYPE=”swap”
/dev/zram6: UUID=”41e9022c-9a91-446c-a05c-2e3cd03f2180″ TYPE=”swap”
/dev/zram7: UUID=”af5e0104-1213-4e49-aea2-c177c97e7118″ TYPE=”swap”

(PS: blkid may need root privilege)

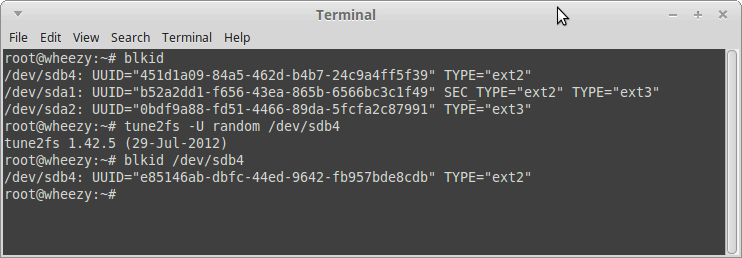
How to generate a new UUID for a partition?
# tune2fs -U random /dev/sda1

tune2fs 1.42.5 (29-Jul-2012)

Use blkid /dev/sda1to check /dev/sda1’s UUID, it’ll be a new one.

Example:

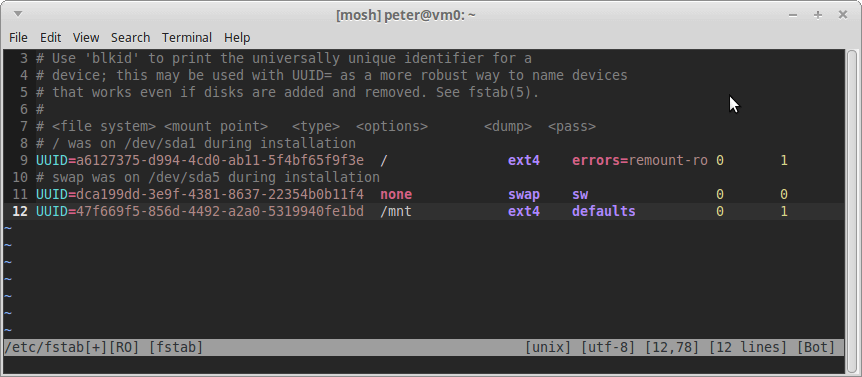
And in /etc/fstab, we should tell others we are now using UUID by UUID= like this:

How to check battery status in cli under Debian/Ubuntu based Linux?

You may need to install upower via sudo apt-get install upower first

Use upower with parameter -e / --enumerate to list the devices:

peter@peter-MacBookPro ~ $ upower -e
/org/freedesktop/UPower/devices/line_power_ADP1
/org/freedesktop/UPower/devices/battery_BAT0

Then use -i / --show-info with the device path to show the details

peter@peter-MacBookPro ~ $ upower --show-info /org/freedesktop/UPower/devices/battery_BAT0
native-path: BAT0
vendor: *********************************
model: *********************************
power supply: yes
updated: Sat 14 Feb 2015 04:11:52 PM CST (9 seconds ago)
has history: yes
has statistics: yes
battery
present: yes
rechargeable: yes
state: discharging
energy: 7.63 Wh
energy-empty: 0 Wh
energy-full: 55.75 Wh
energy-full-design: 57.7 Wh
energy-rate: 15.946 W
voltage: 10.9 V
time to empty: 28.7 minutes
percentage: 13%
capacity: 96.6205%
History (charge):
1423901482 13.000 discharging
History (rate):
1423901512 15.946 discharging
1423901482 14.978 discharging
1423901452 14.740 discharging
1423901422 16.179 discharging

It’s pretty easy to show all details in one line command:

$ upower -e | xargs -n 1 upower -i
native-path: ADP1
power supply: yes
updated: Sat 14 Feb 2015 09:58:27 AM CST (22532 seconds ago)
has history: no
has statistics: no
line-power
online: no

native-path: BAT0
vendor: *********************************
model: *********************************
power supply: yes
updated: Sat 14 Feb 2015 04:13:52 PM CST (7 seconds ago)
has history: yes
has statistics: yes
battery
present: yes
rechargeable: yes
state: discharging
energy: 7.08 Wh
energy-empty: 0 Wh
energy-full: 55.75 Wh
energy-full-design: 57.7 Wh
energy-rate: 18.069 W
voltage: 10.846 V
time to empty: 23.5 minutes
percentage: 12%
capacity: 96.6205%
History (charge):
1423901602 12.000 discharging
History (rate):
1423901632 18.069 discharging
1423901602 16.164 discharging
1423901572 15.799 discharging
1423901542 16.767 discharging
upower screenshot

Use multiple CPU thread/core to make tar compression faster

On many unix like systems, tar is a widely used tool to package and compress files, almost built-in in the all common Linux and BSD distribution, however, tar always spends a lot of time on file compression, because the programs itself doesn’t support multi-thread compressing, but fortunately, tar supports to use specified external program to compress file(s), which means we can use the programs support multi-thread compressing with higher speed!

From the tar manual (man tar), we can see:

-I, –use-compress-program PROG
filter through PROG (must accept -d)

With parameter -I or --use-compress-program, we can select the extermal compressor program we’d like to use.

The three tools for parallel compression I will use today, all can be easy installed via apt install under Debian/Ubuntu based GNU/Linux distributions, here are the commands and corresponding apt package name, please note that new versions of Ubuntu and Debian no longer have pxz package, but pixz can do the similar thing:

  • gz:   pigz
  • bz2: pbzip2
  • xz:   pxz, pixz

Originally commands to tar with compression will be look like:

  • gz:   tar -czf tarball.tgz files
  • bz2: tar -cjf tarball.tbz files
  • xz:   tar -cJf tarball.txz files

The multi-thread version:

  • gz:   tar -I pigz -cf tarball.tgz files
  • bz2: tar -I pbzip2 -cf tarball.tbz files
  • xz:   tar -I pixz -cf tarball.txz files
  • xz:   tar -I pxz -cf tarball.txz files

I am going to use Linux kernel v3.18.6 as compression example, threw the whole directory on the ramdisk to compress them, and then compare the difference!
(PS: CPU is Intel(R) Xeon(R) CPU E3-1220 V2 @ 3.10GHz, 4 cores, 4 threads, 16GB ram)

Result comparison:

Time spent:
.                                  gzip         bzip2                    xz
Single-thread       17.466s     50.004s       3m54.735s
Multi-thread           4.623s      13.818s       1m10.181s
How faster ?          3.78x          3.62x                3.34x

Because I didn’t specify the compressor parameter, just let them use the default compress level, so the result file size may be a little bit different, but quite close, we still can add parameters to the external compression project like this: tar -I "pixz -9" -cf tarball.txz files, just quote the command with its argument, which is also pretty easy.

With parameter -9 to increase the compress level, it might need more memory when compressing, the result will become 81020940 bytes but not 84479960 bytes, so we can save additional 3.3 mega bytes! (also spent 40 more secs, you decide it!)

This is very useful for me!!!

Building NAT on Debian GNU/Linux with iptables

interfaces:

eth0(internal):
192.168.1.254
eth1(external):
aaa.bbb.ccc.ddd

enable forwarding:

sudo sysctl net.ipv4.ip_forward=1

iptables commands(can be saved to a shell script):

clean up old rules

iptables -F
iptables -t nat -F
iptables -t mangle -F
iptables -X

accept loopback traffic

iptables -A INPUT -i lo -j ACCEPT

allow internal connections

iptables -A INPUT -m state --state ESTABLISHED,RELATED -j ACCEPT
iptables -A FORWARD -i eth1 -o eth0 -m state --state ESTABLISHED,RELATED -j ACCEPT
iptables -A FORWARD -i eth0 -o eth1 -j ACCEPT

masquerade

iptables -t nat -A POSTROUTING -o eth1 -j MASQUERADE

reject connections from eth1

iptables -A FORWARD -i eth1 -o eth1 -j REJECT

Easy and fast!

backup the rules:


sudo iptables-save > /path/savedConfig

auto load the rules:


sudo sh -c "echo 'pre-up iptables-restore < /path/savedConfig' >> /etc/network/interfaces