nginx now supports http/2.0
My blog is now http2.0 enabled!
nginx supports http/2.0 since version 1.9.5, if you have your own ssl cert for your own domain, you can now easily setup a http/2.0 enabled web server via nginx!
I’ll use Ubuntu 14.04 LTS as an example here, and assume you already have a https enabled site via old versions of nginx.
Add nginx mainline repository from nginx.org:
[bash]
$ sudo sh -c ‘echo deb http://nginx.org/packages/mainline/ubuntu/ `lsb_release -cs` nginx > /etc/apt/sources.list.d/nginx_mainline.list’
[/bash]
Add PGP key for apt:
[bash]
$ curl http://nginx.org/keys/nginx_signing.key | sudo apt-key add –
[/bash]
Update apt repository local cache:
[bash]
$ sudo apt-get update
[/bash]
Remove old nginx(remember to backup your configs!):
[bash]
$ sudo apt-get remove nginx nginx-extra nginx-common
[/bash]
Now install the latest version of nginx:
[bash]
$ sudo apt-get install nginx
[/bash]
Make sure that you are now using ningx v1.9.5 or newer version that supports http/2.0
[bash]
$ nginx -V
nginx version: nginx/1.9.5
built by gcc 4.8.4 (Ubuntu 4.8.4-2ubuntu1~14.04)
built with OpenSSL 1.0.1f 6 Jan 2014
TLS SNI support enabled
configure arguments: –prefix=/etc/nginx –sbin-path=/usr/sbin/nginx –conf-path=/etc/nginx/nginx.conf –error-log-path=/var/log/nginx/error.log –http-log-path=/var/log/nginx/access.log –pid-path=/var/run/nginx.pid –lock-path=/var/run/nginx.lock –http-client-body-temp-path=/var/cache/nginx/client_temp –http-proxy-temp-path=/var/cache/nginx/proxy_temp –http-fastcgi-temp-path=/var/cache/nginx/fastcgi_temp –http-uwsgi-temp-path=/var/cache/nginx/uwsgi_temp –http-scgi-temp-path=/var/cache/nginx/scgi_temp –user=nginx –group=nginx –with-http_ssl_module –with-http_realip_module –with-http_addition_module –with-http_sub_module –with-http_dav_module –with-http_flv_module –with-http_mp4_module –with-http_gunzip_module –with-http_gzip_static_module –with-http_random_index_module –with-http_secure_link_module –with-http_stub_status_module –with-http_auth_request_module –with-threads –with-stream –with-stream_ssl_module –with-mail –with-mail_ssl_module –with-file-aio –with-http_v2_module –with-cc-opt=’-g -O2 -fstack-protector –param=ssp-buffer-size=4 -Wformat -Werror=format-security -Wp,-D_FORTIFY_SOURCE=2′ –with-ld-opt=’-Wl,-Bsymbolic-functions -Wl,-z,relro -Wl,–as-needed’ –with-ipv6
[/bash]
(–with-http_v2_module)
The critical part – http/2.0 config, you should configure your https server as usual, make sure everything is okay, then open your config again, find the part listening config:
server {
# SSL configuration
#
listen 443 ssl ;
listen [::]:443 ssl ipv6only=on;
.
.
.}
Add the keyword “http2” behind “ssl” like this:
server {
# SSL configuration
#
listen 443 ssl http2;
listen [::]:443 ssl http2 ipv6only=on;
.
.
.}
Restart nginx service:
[bash]
$ sudo service nginx restart
[/bash]
If there is no any error message/log, then you should now have a http/2.0 enable web server!
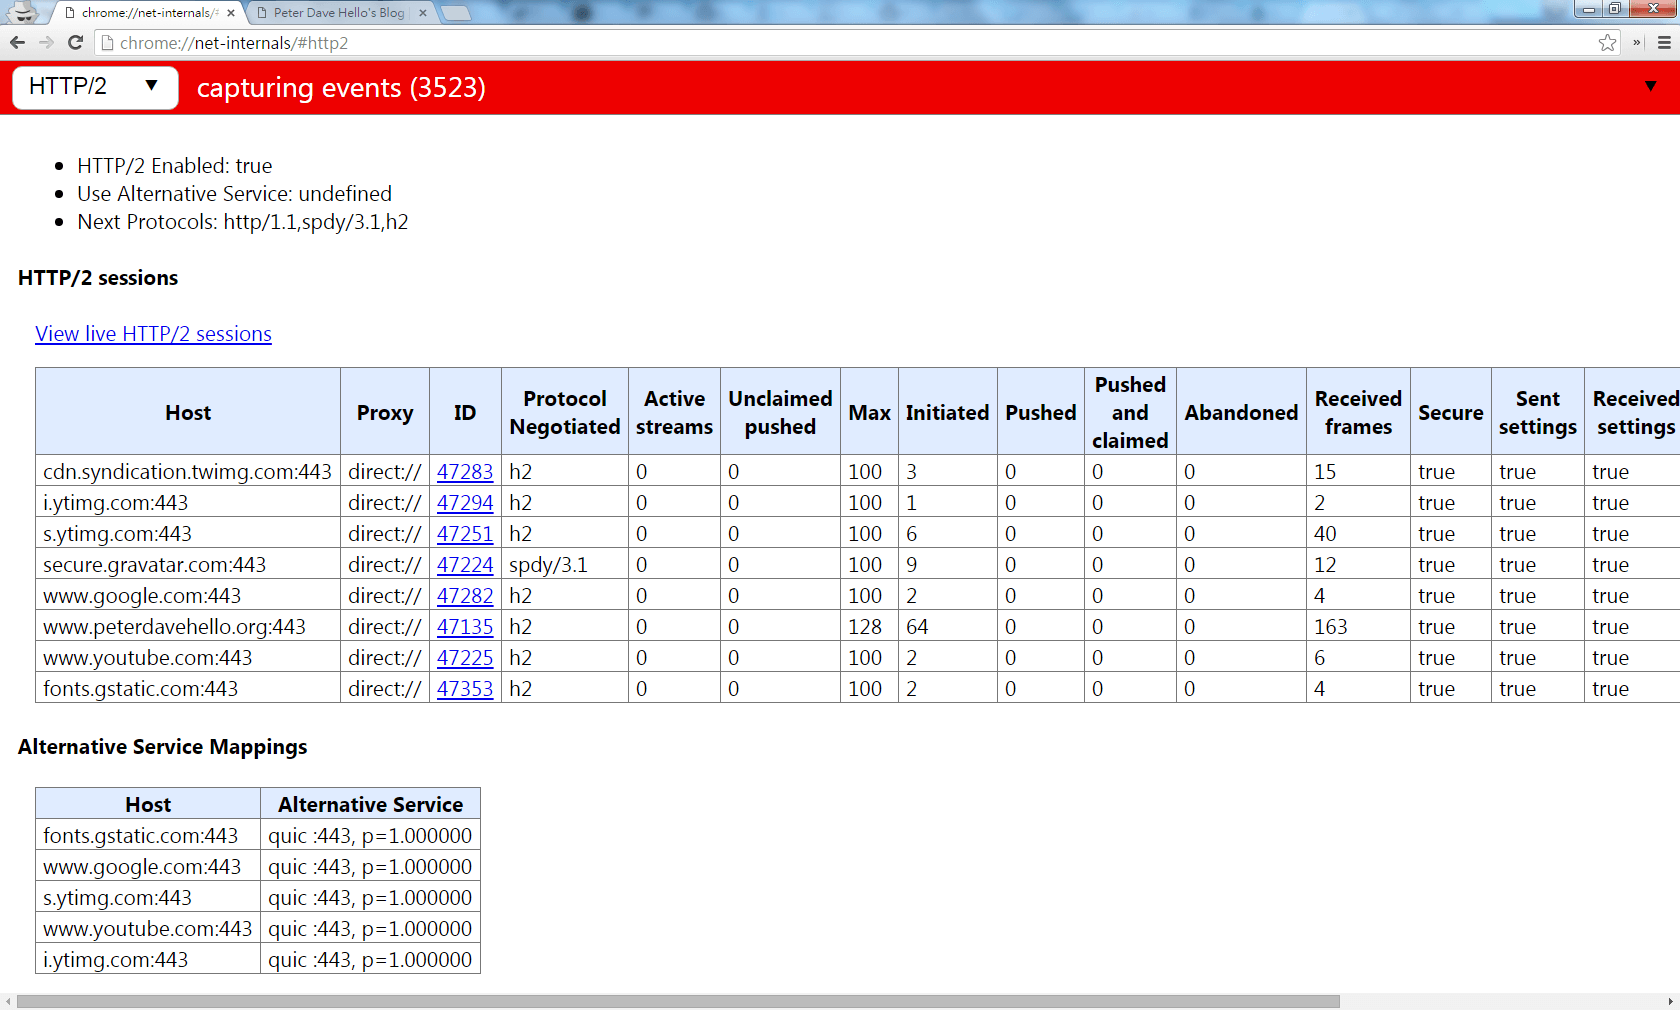
You can use the “HTTP/2 and SPDY indicator”(for Firefox, for Chrome) browser extension to help you detect if http/2.0 is now enable!
Example, take a look at the right side of the site url:

If you are using a chrome/chromium based browser, this links can also help you confirm the http/2.0 connections:
chrome://net-internals/#http2