在 Linux 底下,拿 Apache 或 nginx + PHP 是架網站非常常見的組合 (LAMP/LNMP),這篇要筆記一下怎麼藏伺服器相關的版本資訊
對於開發平台來說這些 http header 資訊可以幫忙除錯,但對於開放使用者存取的服務,若非使用上的需求,建議是把相關的 http header 藏起來,減少資訊洩漏
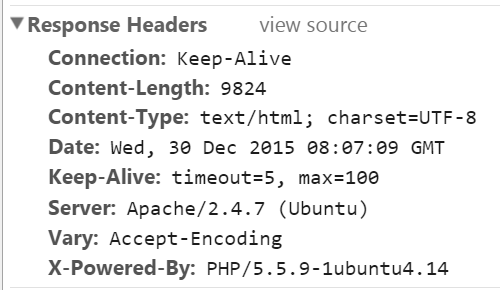
圖例,用 Chrome 瀏覽器看出 Server版本為 Ubuntu 14.04 + Apache 2.4.7 + PHP 5.5.9 本篇拿 Ubuntu/Debian based GNU/Linux 示範,開始動手之前,大家可以先用 curl 這個工具把網站的 header 撈出來,改完之後就可以比較看看結果!
命令如下,127.0.0.1 請換成自己的網址~
$ curl -LI 127.0.0.1結果大概會長這樣:
HTTP/1.1 200 OKServer: Apache/2.4.7 (Ubuntu) X-Powered-By: PHP/5.5.9-1ubuntu4.14
有看出端倪了嗎?
接下來講動手做,先說 http 伺服器的部分:
– nginx:server_tokens 這個設定並設為 off ,記得拿掉前面的註解,如果找不到這行也可以自己新增:
server_tokens off;重啟 nginx 後大功告成:
$ sudo service nginx restart– apache:security .conf 裡面,看設定檔名稱就可以顧名思義知道和安全性有些關係
如果找不到 conf-enabled /security.conf 但找的到 conf-available /security.conf,表示設定檔沒被啟用,可以透過這個命令啟用:
$ sudo ln -s /etc/apache2/conf-available/security.conf /etc/apache2/conf-enabled/security.conf這邊我們要改兩個設定,分別是 ServerTokens 和 ServerSignature
ServerTokens 會在每一次伺服器回應請求的時候送出,設定值分別有 Full | OS | Minimal | Minor | Major | Prod 這六個選項
ServerSignature 不是在 http header 裡面的資訊,但會出現在一些 Apache 自動產生的頁面,顯示出伺服器版本以及 virtual host 等資訊
重啟 Apache 後大功告成:
$ sudo service apache2 restart改完之後再用curl測試一次結果會發現 Server header 後面版本、系統等資訊都藏好了:
HTTP/1.1 200 OKServer: Apache X-Powered-By: PHP/5.5.9-1ubuntu4.14
但上面的 PHP 還在,而且還看得出來是 Ubuntu 系統,如果你有啟用一些額外的module 可能都會順便被印出來,所以接下來講 PHP:
PHP 這邊要改的這個設定叫做 expose_php,這個設定會放在 php.ini 裡面、預設是 On、這邊要調成 Offexpose_php = Off
如果該選項為 On,則 http header 裡面會含有一個 X-Powered-By 的資訊,除了讓大家知道你用的是 PHP 以外,還有使用到的相關模組,還有可能會因此透漏PHP以及作業系統的版本,因各個unix系統幾乎都有自己維護的套件版本,在編譯時可能會因此把作業系統及其版本資訊包進去(如 5.4.4-14+deb7u9 就透漏了他可能正在使用 Debian Wheezy (7.x)),這個資訊不關的話,Apache2的 ServerTokens 很有可能就白設了XD
改完後這邊要重啟的服務因人而異,如果是 PHP 搭配 nginx 可能是要重啟 php-fpm 或 php-cgi,如果是把 PHP 編成 Apache 的 module 的話就是重啟 Apache
重啟後大功告成(自己看要重新啟動哪個服務~因人而異):
$ sudo service apache2/php-fpm/php-cgi restartHTTP/1.1 200 OKServer: Apache
恩,有沒有看到 X-Powered-By 不見了?
補充一點,php.ini 可能因為不同的 PHP 使用方式 (apache module / cgi / cli 等) 會有 “很多份”,以 php5 為例,如果你是用 Apache 的 php module,則設定檔會在 /etc/php5/apache2/,若是使用 command line的 PHP,設定檔會在 /etc/php5/cli/,真的不確定的話 … 保險起見,可以將 /etc/php5/ 底下一層各個目錄都翻一下,每份 php.ini 都改一改 (mods-available 是放模組的就不用了)
最後補充,以上方法僅用於 “藏” 資訊,對於找工具針對特定版本伺服器的攻擊也許有點幫助,但並不能真的提升伺服器以及網頁程式本身的安全性,不能就此掉以輕心! 程式面該過濾、跳脫、阻擋的還是要做,永遠不能相信client傳過來的訊息啊~!
另外有一些像是 libapache2-mod-security2 這類的工具可以幫忙防禦一些常見攻擊或是弱點,不過設定不好的情況下也是有很大機率遇到其他狀況,要不要用就見仁見智了,我是遇過用了 mod security 之後預設設定會造成 Discuz 的上傳故障的問題 …